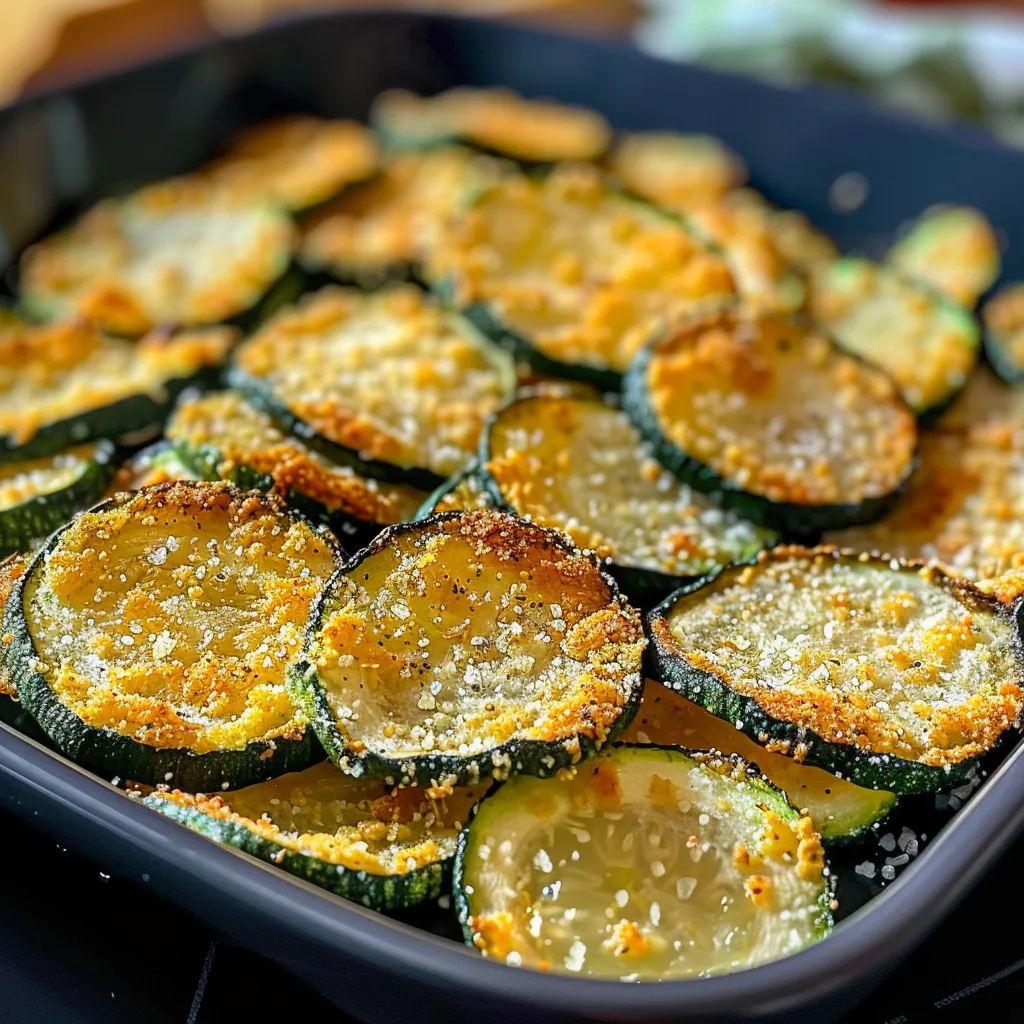
Hey there, fellow foodies! Are you looking for a delicious, healthy snack that’s as easy to make as it is addictive? Well, you’re in the right place! Today, I’m sharing my secret to making the crispiest, most flavorful zucchini chips you’ve ever tasted. Perfect for munching on while working from home, these chips are a game-changer for anyone seeking a guilt-free snack option. Plus, they’re a fantastic way to get your daily dose of veggies in a form that even the pickiest eaters will love!
Why You’ll Love This Recipe
- Light, crispy, and full of flavor—these zucchini chips are the perfect alternative to store-bought snacks.
- Ready in under 30 minutes, this recipe is a quick and easy solution for a healthy work snack or a family-friendly treat.
- Customizable to your taste—whether you prefer a hint of garlic, a smoky twist, or a cheesy kick, this recipe adapts to your flavor preferences.
- Low in carbs and gluten-free, making it a great option for those with dietary restrictions.
- Perfect for meal prepping—enjoy these chips throughout the week as part of your healthy work snack ideas or pack them as a clean protein snack for on-the-go.
Ingredients
Here’s what you’ll need to make these deliciously crispy zucchini chips:
- 2 medium zucchinis
- 1–2 tablespoons of olive oil (or avocado oil for a healthier option)
- ½ teaspoon of sea salt
- ½ teaspoon of garlic powder
- ½ teaspoon of smoked paprika (optional for a little extra flavor)
- ¼ teaspoon of black pepper
- Grated parmesan (optional for added flavor and crunch)
Full ingredient list with measurements is provided in the printable recipe card below.
How to Make the Recipe
Let’s dive into the step-by-step process of making these crispy zucchini chips. It’s easier than you think, and with a few simple tricks, you’ll achieve that perfect crunch every time!
Step 1: Preheat Your Oven
Start by preheating your oven to 225°F (110°C). Yes, you read that right—225°F! A lower temperature helps dry out the zucchini slices evenly without burning them, ensuring that crispiness we all love.
Step 2: Prepare the Zucchini
Wash the zucchinis thoroughly and pat them dry with a clean kitchen towel. Slice the zucchinis into very thin rounds, trying to make the slices as uniform as possible. Thin slices are key to achieving that perfect chip-like texture.
Step 3: Remove Excess Moisture
Place the zucchini slices in a single layer on a paper towel-lined baking sheet. Sprinkle with a pinch of salt and let them sit for about 10 minutes. This step draws out excess moisture, which is crucial for getting crispy chips. After 10 minutes, gently pat the slices dry with another paper towel to remove any remaining moisture.
Step 4: Season the Zucchini Slices
In a large bowl, toss the zucchini slices with olive oil, garlic powder, smoked paprika, black pepper, and a pinch of sea salt. If you’re using parmesan, now’s the time to sprinkle it on and toss again to coat evenly. Let the slices sit for a few minutes to allow the flavors to meld.
Step 5: Arrange and Bake
Line a baking sheet with parchment paper or a silicone mat. Arrange the zucchini slices in a single layer, making sure not to overlap them. Bake in the preheated oven for 45-60 minutes, flipping the slices halfway through. Keep an eye on them during the last 10 minutes to ensure they don’t overcook.
Step 6: Check for Crispiness
After 45-60 minutes, remove the chips from the oven and let them cool slightly on the baking sheet. They should be crispy and golden brown. If some slices are still soft, return them to the oven for a few more minutes and check again.
Pro Tips for Making the Recipe
Here are a few expert tips to ensure your zucchini chips turn out perfectly every time:
- Use a Mandoline Slicer: For the thinnest, most even slices, consider using a mandoline slicer. Just be careful with those sharp blades!
- Don’t Overcrowd the Baking Sheet: Give the zucchini slices plenty of space to allow air to circulate around them. This prevents steaming and ensures crispiness.
- Broiler Trick: If you want an extra crispy texture, place the baking sheet under the broiler for 1-2 minutes after baking. Watch closely to avoid burning.
- Experiment with Seasonings: While the recipe includes garlic powder and smoked paprika, feel free to get creative! Try adding a pinch of cumin, dried herbs, or even a sprinkle of chili powder for a spicy kick.
How to Serve
These crispy zucchini chips are incredibly versatile. Here are a few ideas for how to enjoy them:
- As a standalone snack—perfect for munching on while working from home or enjoying as part of your healthy work snack ideas.
- As a crunchy topping for salads or soups.
- As a side dish for your quick family dinners or 30-minute meals.
- Paired with your favorite dip, like hummus or guacamole.
Make Ahead and Storage
One of the best things about this recipe is that it’s perfect for meal prepping. Here’s how to store your crispy zucchini chips:
- Let the chips cool completely on the baking sheet before transferring them to an airtight container.
- Store them at room temperature for up to 3 days. For the best texture, keep them away from humidity.
- If you live in a particularly humid climate, consider storing them in the fridge to maintain crispiness.
And there you have it—a simple, delicious, and healthy snack that’s perfect for any time of day. Whether you’re looking for easy healthy baked goods, healthy no carb snacks, or snacks for work no fridge, this recipe checks all the boxes. Give it a try and let me know what you think in the comments below!
Ready to get started? Click here to access the full Crispy Zucchini Chips Recipe and print it out for your kitchen!
Crispy Zucchini Chips Recipe
Ingredients
Method
- Step 1: Preheat Your Oven
- Step 2: Prepare the Zucchini
- Step 3: Remove Excess Moisture
- Step 4: Season the Zucchini Slices
- Step 5: Arrange and Bake
- Step 6: Check for Crispiness